So, this is a requirement in order to get past the ACE {technical cert}
and the CNSE.This is also a decent module for understanding how to configure a firewall and get started.
The negative is that the training material requires a lot of scrolling.
So I'll try to extract it into something you can read on a blog.
Hopefully you'll be real confident once I am done and will order you Palo Alto firewall
or a Vmware trial one.
Let's start.
This is a cheat sheet I made with the firewalls.
The bottom is the Maximum performance number.
The left is the maximum sessions.
I also marked out the firewalls that have XFP/SFP+ transceiver slots

Let's start with the first item.
These things are differentiators which you will need to know in order to articulate why
the client should buy and specifically pay more for Palo Alto.
Single Pass
Competition

This is a sample of the Juniper Flow.
As you can see it goes through steps.
You finish with the zone, it does policy, finish the policy it does UTM,
finish with UTM anti spam, it does UTM anti-virus.
According to Palo Alto their firewall by using multiple cores and processors will run these checks in
parallel.
The second thing is that it will not re-compile files in order to scan them but will scan the stream for a signature.
So. This is what Palo Alto's single pass will look like.

s
Now, other companies are going to claim they "bundle" everything into one device too.
So, to clarify. Other companies will do consolidation.
For example.
This is the Cisco ASA with the IPS card.
So data will go through the firewall ---- then exit the bus and come into the IPS card.
then back out the ports.
While in the Palo Alto, at the same time the routing is being done the Firewall will scan the packet for signature for the IPS and run the AV scan.
So the Cisco is "consolidation"
The Palo Alto is integrated into one.
If you look at the above Single pass.
The control plane is separate from the data plane. This means you can update the device while still keep forwarding going.
The networking is the L2 , Layer3
App-ID classifies flows based on application instead of ports.
User-ID allows you to integrate the firewall with AD
Content-ID looks at the inside of the streams. Data {credit card}. Threats {viruses}. URL filtering
Policy refers to the normal firewall policies you create.
Advantages of Single Pass.
Low latency as you did it once.
Scalability as you open less threads
Lack of Proxy - no need to build a whole file to scan it.
negatives.
Mail works badly. Can't quarantine and blocking attachments will cause them to be re-transmit.
ZIP,GZIP are the only ones that can be decompressed and scanned .

This is done by separating the part like the image above will show you.
For example PA-4000 has a network ASIC and 16 cores
PA-2000 has a FPGA or field programmable ASIC. and 4 cores
ContentID will have its own FPGA.
management is a separate control plane.
FLOW
https://live.paloaltonetworks.com/docs/DOC-1628
sss

Let's look at the start.
A packet arrives.
It will be parsed. This means broken into parts.
L2/L3/L4 information will be collected from the right parts of the TCP/IP packet.
Ingress interface and zone lookup will be collected by looking at the interface it came in.
IP fragment will be re-assembled, if two parts are matching then it will be dropped to avoid
tear drop attacks.
If the packet is fine we move on.
If the packet doesn't need a firewall inspection it skips to the send at the end.
If there is an inspection.
Well, if this is a second packet of a session it will go to FAST PATH.
If it is a first packet then it go to the SLOW PATH.

These are the paths.
If the slow path is good, it will install a session so future packets can go on the freeway or fastpath.
As you can tell, the application identification APP-ID which recognizes applications instead of ports
and the Content Inspection or CONTENT -ID run in separate slots at the same time to help
shorten the times.
When the security part is done.
 It is back to normal sending and if needed it is sent to an SSL/IPSEC VPN tunnel.
This is another example.
The source zone will be determined by the interface it comes in on/ address of the Packet.
It will be forwarded using the routing table/forwarding.
This will determine the destination zone.
NAT will be done.
The firewall will check if the port is allowed. If it is it will create a session.
Application decryption will be done if needed.
APP ID will recognize it.
Security policy will be applied based on the APP-ID/content-id/USER-ID
The packet will be re-SSL'd then NAT'd then forwarded.
A little simplistic, I prefer the first flow diagram.
Alright, that was the basics of the firewall.
Module 1 : administration and management.
192.168.1.1 management interface.
It is a control plane IP, so this is a separate plane.
or
Console cable. RJ-45 {in the PA-4000 it is a serial}
The management interface doesn't have any security zone.
So let's start.
You plug in the console or you login from the management.
In this case you can see the user's PC is 192.168.1.4 and he SSH'd to the 192.168.1.1

So type
>CONFIGURE
This will change the prompt to #
Then you can type the long Megila {scroll in the bible}.
#set deviceconfig system ip-address 10.30.11.1 netmask etc etc.
Now you can change the IP on your PC to 10.30.11.x and put it on the management switch.
DNS is a must to get the ability to reach the update servers.
MGT does not route traffic it can only work as a node, so you can use MGT as a firewall port.
Same thing using the GUI.

You click on the device tab
Then click on the SETUP at the left pane.
Then click on the management tab.
This will open up the management.

s
So if you notice, there are small icons that look like gears.
When you click on them. They open up into the ability to config and make changes.

So, I click on the gear and it opens up.
You can now put in the IPs using GUI.
IP, mask, gateway,
IPv6 is supported , IPv6 gateway
Speed if you want to negotiate 10/100/1000
MTU
and you can select which ways you can access the device.
For example I can disable HTTP.
You can also set up a specific range of IPs that can access the device.

s
Management.
This is done using the GUI as this is the most flexible and versatile.
The main person Nir Zuk is a GUI guy so all the R&D goes into the GUI.
I wouldn't bother with the CLI other than to set up the IP.
You can see above that access to the management IP can be limited to SSH for example and Telnet can be denied. You can't block the Console.
GUI access is https://<firewall>
You can access specific reports using https://<firewall>/API

s
This is the result of the /API.
It is basically a "help" file.
If you click on the parts
it will give you the correct command to add to the URL.
s
For example.
API > Reports > predefined > threat-trend
https://192.168.2.20/api/?type=report&reporttype=predefined&reportname=threat-trend&REST_API_TOKEN=1080290877
This will generate an XML with the data for you, which you can then use in another item.
s

so next to the Tasks you have languages.
The ones supported are.
Chinese traditional
Chinese simplified.
English
French
Japanese
Spanish.
Elvish.
Changing languages doesn't require a commit.
The tasks tab is good for telling if a commit ran , is done and success.
The Help is context sensitive and opens up an HTML.
This is the sub-item and how to edit something that is marked in blue.

Next

The device will offer you some GUI prompts.
Like when you hover over a yellow line it will tell you the field is required.
The ACC in the GUI.
ACC stands for Application Command Center.
This will be the main screen you spend your time on trying to see patterns and getting added
value from the Palo Alto.
It's the second MAIN tab. ACC

So what you see is the "current" threat level. Being 3.6 this will show if your firewall is experiencing an attack.
The second this is you can select the Data range dynamically so past hour, past day, past month etc
Then you can arrange it by sessions, bytes, threats and how many to see, like top 25.
The items in the report are blue so you can click on them.
Then the report will filter based on the item you clicked.

In this example I clicked on the "facebook" so it added it as a filter at the top right.
It gives me some details and tells me why the risk. 1 is low 5 is high
Then it gives me top sources
This for example would easily allow me to see who uses the facebook application the most.
Now the system is not perfect.
For example it thinks 212.124.122.xxx is in russia
but ARIN says that IP range belongs to holland.
Alright back to GUI.
The ACC a
Monitor tab.
 so here you have MONITOR as a tab.
Then you can look at the sub item Logs
and select a log - in this case I selected traffic.
So
Monitor >> Logs >> Traffic .
The log is clickable.
So when I clicked on the line I got the log details for the event in a pop up.
CLI Mode.
Operational > does not make changes.
Configuration > makes changes. requires a COMMIT in order to run the changes you make.
You have the usual ? question mark you can use to help get context aware help and complete commands.
Pipe | is allowed and can be used to match or except show run | match something
* means this option is required to run the command.
XML API,
PAN OS allows you to use XML API to make changes to the firewall and get data.
This is used so you can integrate this device with third party products.
For example in Amdocs, we had a central NOC and in order to have the main system talk to
all the different management products to get data we would write code.
So NOC system --> script using API --> Panorama --> Firewall . This will give me the result.
If you join Palo Alto developer forum there is more information on the script.
API browser we discussed above.
https://<firewall>/api will give you the help menu and then you can find the relevant API you need.
Managing the firewalls - Accounts.

So the places where the users can come from are.
Radius Server
LDAP
Kerberos
Local database - in the local database you can create users manually and put them in groups.
Certificates {couldn't find this}
So

In this case the users who ahve the Authentication sequence sequence_test applied to them.
Will first be authenticated by the radius, then by the device itself.
When you create an admin role to manage the firewall.
You can use the three that are created by default.
auditadmin
cryptoadmin
Securityadmin
or create new ones.
When you create a new one, you can granularily control the access.
In the case of the WEB UI enable/read only/ disable
In the case of the XML it's enable / disable
In the case of the command line, you can't control the granularity and must choose a role.

CLI permissions
None = can't access
superuser = all access
superreader = read all
Deviceadmin = can't create new vsys and can't create administrative accounts.
Devicereader = read only access to the same vsys {not clear}
VSYSadmin -= access to a vsys
VSYSreader -= read access to that vsys
VSYS,
You can carve out the firewall logically into separate firewalls.
For example I bought.
PAN-PA-5060 Palo Alto Networks PA-5060 $130,000
I can apply the
PAN-PA-5060-VSYS-50 Additional 50 virtual systems(max 225 per device) $45,000
So, now even though I have one physical firewall. I can give a VSYS to each of the 50 clients.
So each one can manager their "instance" or as Palo Alto calls it VSYS virtual System.
So to each client I would give VSYSadmin so they won't ruin the firewall for others.
Craeting an administrator.
So you give it a name.
You say how it will be authenticated, either a profile or a sequence of profiles.

Then you pick if it will use a Dynamic role
Superuser everything
Superuser read only
Device administrator - can't create new VSYS or new users.
Then you select a password profile.
A password profile can set limits on retries and lockout timers.
Configuration.
In Cisco you have
Startup Config which is saved in memory. When you reboot it goes to this.
Runinng config is when you make changes. Unless you save it to the startup config. Then when you reboot it will be deleted.
In Juniper and Palo Alto.
They use the opposite process.
You have a configuration. Called a Running config.
Now when you change something, then nothing will happen. For example you can create another user
but he won't be able to log in. {this is called a candidate config because it is not yet in action}
Now, at this point you run a COMMIT
Now the candidate config became the running config.

I created the above slide to help you commit.
If it is blue or you hover over it, then it will tell you there are pending changes.
If you click commit, you can commit or choose advanced.
Once you committed you can check the progress.
Transaction locks.
If two admins are working at the same firewall at the same time.
So to solve this you have a little icon next to the commit.
It is a LOCK.

so the lock is next to the commit.
You can see if anyone has applied a lock.
If there is not lock, you can apply a lock.
When you are done, you can remove it.
There are two types.
Config lock - prevents them from making ANY changes to the configuration. {Globally or per Vsys}
Commit lock - blocks others administrators for commiting until you are done.
Clicking on the lock will show you who is locking the system then you can call him
A Superuser can remove the locks when he feels like it.
saving and loading

in Device --> setup --> operations you can run some operations.
For example you can save the running config.
You can load a backup of a config.
You can validate the config will work before committing it.
So let's say you want to import a config.
Then you load a config to the candidate config.
then you COMMIT it
in order to see what you have done or what changes someone else has done you can compare configs.
Device --> config audit.
 in this example I simply changed the banner.
So you will be able to see WHICH user made the change and when.
This helps when you want to troubleshoot which admin crashed the firewall or decided to block management's youtube privileges.
3

So
Device --> Licenses will easily show you when your licenses started and when they expire.
Device --> Support will show you the support level you have , allow you to open a ticket and generate
A "tech support file" which you can send to Palo Alto support .
Upgrading the Palo Alto.

Pretty neat.
Click the check now.
Click download to get it from the web.
Then click install....
You can also download it to your desktop if you have slow connection.
Then upload it to the firewall.
Then "install from file".
Upgrading and updating the Updates.
remember the things you paid for like Antivirus , wildfire, global protect subscriptions.
To update them go to
Dynamic updates.

Same as before.
You can click check now.
You can download and install.
You can also set up a "schedule". The Schedule will do it for you.
If you don't have web access you can also do this manually by uploading files from your desktop
and installing them.

Configuring interfaces.

TAP mode is what I have.
The TAP is used to see traffic but can't block any traffic.
vWIRE this will be a bump in the wire and will not require an IP.
Layer 3 must have an IP for the firewall, allows the firewall to set up VPNs.
You can mix and match interfaces on the firewall.
So the firewall can be used for a few parts of the network.
Zone - Systems with similar security requirements are grouped into zones.
Example :
Zone - LAN
zone - DMZ
zone - Exchange Web servers
Zone - Exchange backend servers.
Policy rules are rules from ZONE to ZONE2
At the bottom are two implicit rules
By default a firewall will block any traffic from a zone to another zone.
By default all traffic from a zone to another device in the same zone will be allowed.
So far so good.
If a packet hits the implicit rule it won't generate a log entry.
Palo alto recommends not putting an EXPLICIT Deny all at the end
as that will take precedence and will not allow traffic to go from devices in the same zone to other ones
in the same zone.
configuring the interfaces.
TAP interface

This one is pretty easy.
The reason is that a TAP doesn't need an IP, it will just take in traffic from the network TAP.
A TAP must belong to a security zone to see that security zone's traffic.
vWIRE interface

I tried to cram everything to one slide.
So let's elaborate.
The vWIRE is a bump. It does not have an IP.
It is a v for Virtual Wire.
So you need to think, there needs to be a virtual Wire from one port to another and the Palo
alto is transparent on the wire.
So Port 1 and Port 2 will be connected or in my case ethernet1/7 and ethernet1/8
The way you do it is simply click Device>>interfaces>>interface 1/7
then select Virtual Wire as the interface type.
Repeat this with Device>>interfaces>>interface 1/8
Now if you switch to Device >> Virtual Wires then click on ADD
You will get a Virtual Wire pop up you can fill in.
The name is up to you.
Then simply select as interface 1 interface X {1/7 in my case}
and interface 2 interface Y {1/8}
That's it, you should now have a vWIRE set up.
With two interfaces making it up.
Other
There is a Multicast Firewall checkbox - click on it to firewall multicast too.
Tag allows -0-4096 allows everything or you can limit it.
Netflow works on all firewalls except for the PA4000
s
Layer 2 palo alto

Layer 3 Palo Alto.

so, layer 2 will be used for example in a remote office.
To avoid using a core, simply connect all the switches to the Firewall.
The only negative there is that the firewall does not participate in STP

Pretty easy,
Choose Layer 2
Then choose the VLAN.
You will need to do this on two or more ports.
You can also add this to a security zone.
Now layer 3.

Select the layer 3.
Now,
There is a tab IPv4
Simply put an IP there.

Also, you can make the interface belong
to a virtual router.....
Subinterfaces

so, this basically allows you to TRUNK to a switch.
This allows you to use one interface and define many zones on it
each zone will be a VLAN or a subinterface.
A layer 2 subinterface will just have a vlan TAG and will forward it.
A layer 3 subinterface will have a vlan TAG and it will have an IP, like the example above.
To Create a Layer 2 subinterface.
You need to create a Layer 2 interface.
Then you click.
 add sub- interface
s

So the
Interface is ethernet 1/15 the .200 is the name of the subinterface. so 1/15.200
The TAG is 200. Usually to keep it nice and tidy you should synchronize the numbers
so .200 = vlan 200 this is arbitrary but most network will keep this in sync.
the VLAN is used to forward this to a Virtual Router.
Layer 3 subinterface

In this case I added a TAG 200.
I forgot to add the 1/16.200 so the OK button is blue and I can't press it.

so I fixed it.
Now if I move down there is a TAB for IPv4 where I put my IP.
If I want to match my subinterfaces diagram.
I will create a layer 3 interface
Then create two subinterfaces.
1/16. 200 tag 200 192.168.1.1
1/16.100 tag 100 10.0.0.1
Alright,
You can create subinterfaces that are Virtual Wires.
I didn't get this part, so i will skip it.
s
LOOPback.
This is done in order to create many IPs to the same firewall.
For example.
IP 1 192.168.32.1/32 will be the IP for people to go to the Globalprotect VPN
IP 2 192.168.64.1/32 will be the IP for the IPSEC tunnels to join .

So
Network >> Interfaces >> Loopback >> then add an interface
then add a name a subinterface and give it an IP.
Now the device will respond to this.
This must be a /32 IP.
Now, let's set up a tunnel.
A VPN tunnel will give you a secure tunnel from the firewall to another firewall.

So,
Network >> interfaces >> tunnel tab >> New Tunnel
Now fill in the tunnel number .20
Give it an IP.
The name is fixed and will be tunnel.20
Aggregate
So, if you have an interface that is 1G and you are using it all the time.
Then you can bundle

You take two interfaces.

s
So you take two interfaces. You aggregate them.
You can do this on PA-500 and above.
You can do up to EIGHT aggregated interfaces.

For some reason they have a ADD aggregate group at the bottom of the
Network >> interfaces >> ethernet >> add aggregate group.
So first you create the aggregate and select if it is a layer 2, layer 3, vWire
Then you add the interfaces to the group.
You will have to do the same on the switch at the LAN to match my diagram.
as a best practice on the vWIRE it is recommended to set up two separate vWIREs instead
of aggregating them as then the loadbalancing is based on the AE algorithm instead of simple sending on both.
Security Zones
Each interface can only belong to ONE security zones.
Don't mix and match interfaces in a security zone.
Types
TAP :
Virtual Wire :
Layer 2:
Layer 3:
External *
External is used to move traffic from VSYS one to VSYS 2.
Must have vsys enabled and compatible firewall.

Here you can see the zones being used in the policies.
Remember if you create ANY ANY deny
will stop your intrazone traffic being moved.
Now you can also set up the ANY ANY deny
and set up a zoneA to zoneA allow.
it's up to you.
s
s
LAYER 3 configuration.
Sorry about all the random s you might see, they are used in order to be able to paste images and move them. A "workaround".
So, all layer 3 interface share the same routing table.
Each layer 3 interface has a management profile.
The management profile would allow you to log in to the firewall.
So if you ping a layer 3 interface, that interface won't work and will drop it.
A management profile will allow you to select.
Which IP can be the source address
One management profile per interface.
So
You have a firewall.
The firewall has a few IP addresses.
Now if you remember Cisco when you type
>PING
then select extended it allows you to pick the IP address of the sender.
So same here.
 see here.
Device >> setup >> services.
Now I can use management interface
or I can setup my outgoing interface as a different one.
I can also go granular and set up
range X to go with interface X
and range Y to go with interface Y.
for example.
The management can go get the updates using the management network switches. etc
So now we can limit which IPs can PING the firewall.

In this case limited the range.
Now.
DHCP .
The firewall can work as a DHCP so you can use it at remote locations.

So simple.
Set IP pool of addresses.
Set up a gateway
Set up the DNS .
As you can see there are some limitations.
You can't set up a TFTP server which means VOIP won't be able to get a config.
So if you want a real DHCP, get a DHCP server.
 Policy based Forwarding.
PBF
OK,
Let's say you want the phones to go out the T1 interface.
Then you want the data to go out the Data interface .
In older devices this was not possible.
In newer ones you can use a PBF.
There are six fields that can be used to create a match.
So for example.
If Source Address 10,0,0,0/24 then send it to T1
If source address 192.168.1.0/24 then to FIOS.
 Virtual Router.
This creates another copy of the routing table.
This allows you to logically separate the routing part of the device into more routers {logically}
Pretty simple.
Add the interfaces that belong to that virtual router.
An interface can belong to one Virtual Router only.
Virtual Router can forward to another virtual router.
Are you going NATs on me ??

simple enough.
Source NAT is you going to the internet .
Destination NAT is used so people can reach you and be pointed to one of your servers.
The goal here is
1. Save IP addresses
2. Protect your private IPs from being exposed publicly which would make it easier for them to be attacked.
the firewall will NAT or translate the network address
NAT = Network address translate.
Source NAT.
Dynamic IP/PORT A pool of devices will use ONE IP with many ports.
Dynamic IP a pool of devices will use many IPs
Static
Dynamic IP/PORT
|
MANY IPS
|
One IP - with many ports.
|
Dynamic IP
|
Many IPs
|
MANY IPS
|
static
|
ONE IP
|
to ONE IP
|
In my experience.
Dynamic IP/port or PAT is almost always used.
Static allows you to map a server to a single IP.
No NAT can be done, this turns off nat.
Not sure where you would use this in real life.
Destination NAT
static is one to one so you can look at it as a destination one.
Port Forwarding
Public : 80 == web :80
Public port 81 == web2:80
Public port 82 == web3:80
 For configuration they decides to put the NAT in policies.
So Policies >> NAT you have an ADD clone, enable ,disable move up and down.
etc.


So for the NAT.
Source untrust
Destination Untrust
Translate destination LANWEBserver
For the security policy.
Source untrust
Pre-NAT IP
Post NAT zone is trust.
Layer 3 support NAT 64
IPv6 to IPv4.
As you can tell I am a bit weak on the NAT and it is hard to practice with a single TAP firewall.
IPv6
Enable IPv6 firewalling

So
Device >> Setup >> sessions enable the IPv6 firewalling.
IPv6
RIP/ OSPF is not supported
IPsec or SSL VPNs are not supported.......
So no routing and no vpns.

So on the interface pick the IPv6 tab.
Put the IP and you are all set.
You can set up a Dual stack by enabling IPv6 and IPv4
Palo Alto updates can only be gotten using IPv4.
APP-ID
 s
sSo, a packet arrives.
The first check is if is is allowed on the interface.
The second one is if the port will be allowed.
Up to now , there is no DATA coming in. So a session is set.
Now, the data will flow, this is the part where Palo Alto looks at the Application to see the signature
of the data, if it matches, then it will use the APP-ID to mark that application.
Then it will apply a security rule based on the APP-ID.
So for example a bittorrent comes in on port 25.
A normal firewall will think this is mail smtp and let it in.
Palo alto will allow the port, create the session.
Then APP-ID will match the data to the signature Bittorrent and label it as such.
Now if I have a rule saying, if bittorrent traffic then drop.
Then it will drop it.
s

Check the port. - Let's say 80
So allow
Check the signatures - let's say gmail chat
So in this case Palo Alto will send it to the known protocol decoder so it can decode the gmail and find
out it is chat.
Let's say port 80
so allow
Check the signature - let's say facebook.
So in this case it is identified as facebook and the policy is applied.
Let's say port 80
so allow
check the signature - doesn't match.
Well then mark it as a none match and apply a rule
for example ... if appliactions don't match signature then DROP.
Now if you drop it and it is important business application, the user will complain that his "program"
is not working properly and you can try to map that type of traffic by creating a NEW signature.
This is the correct and secure way.
Evasive APP.
An evasive application is one that skips from port to port to find out an open port.
So in short Palo Alto works on recognizing the application itself and not the port.
The port is only used to open the session.

So the first selling point.
Since Palo Alto does a single pass and recognizes the APP it will drop it in the firewall.
Cisco ASA 55x0 will need to move it to a hardware module {2 passes}
Firewall+ IPS will need to move it to two devices
Even firewalls with an IPS subscription will need a second pass as they move it around the backplane
So, let's review and think of this another way.
The Palo Alto blocks ALL. Then allows the DNS application over the DNS port.
The competition allows ALL on the DNS port, then if you have an IPS in blocks known bad applications.
The problem is when you don't have a "bad" signature for a new application. Then the competition will allow it and not block it.

URL filtering vs APP-ID.
URL filtering has nothing to do with APP-ID.
URL filtering simply filters sites based on categories. It is also limited to HTTP and HTTPS
APP-ID structure.
Protocol Decoder - looks within a protocol to find another protocol = gmail --> chat
Application signature - looks at layer 7 signatures
Protocol decryption - opens up SSH and SSL.
Heuristics - tries to guess at patterns.
A protocol decoder opens up a protocol within a protocol at the end it will then apply the application signature.

as you can see each application is recognized and if you click on it you get details.
You can also create new groups and place applications in them.
This way you can reference the group and not have to add applications one by one.
the decryption of SSL and SSH is obvious. That is like opening the bags at customs to check the luggage.
Heuristics tries to guess if the application resembles something bad or nefarious.

So
Policy Rule
source zone and ips
destination zone
recognize the application using the APP-ID and allow it .
**There is no need to tell Palo Alto what to block since by default the last
rule block any traffic that was not allowed.
For address obviously you can use.
FQDN if you have a connection to DNS.
IP netmask /range
Dynamic allows you to filter it based on regions or countries.
If you remember there was a big spam attack for a decade or two.
In order to block it we would rely on websites that had lists of spammers.
rbl.org for example.
Palo Alto can reach out to a site and pull up block lists from it.

In objects
You have dynamic block lists.
You can create many.
Then you can reference them in the policy
for example to block spammers.
URL category tries to match in the policy based on categories like
Social media or sports.
Application dependancy.
Obviously Gmail CHAT must have Http running in order to enable it.
So if you want to allow Gmail CHAT
You need to allow HTTP
and allow Gmail CHAT.

If you look at Objects >> applications
The application will show you if it requires another by being cascaded under.
Also if you click on the application you have a line saying "Depends on applications".
For some applications Palo Alto decided not to require you to add their parent.
https://paloaltonetworks.csod.com/content/paloaltonetworks/publications/61/data/downloads/pan-edu-201%20-%20appendix%20b%20-%20app%20dependencies%20-%20%20rev%20a.pdf
The applications will allow the parent to work
so for example
Facebook will allow the http to work
however if the next packet is not facebook related it will be dropped.
They call this implicit dependacy.
Obviously if you want to you can change the default ports for applications.
Also you can force the application to work on the default port.
For example Citibank app uses port 88
So
If application equals Citibank AND Citibank.port equals 88 then allow.
This helps prevent port hopping and spoofing.
Security Profile.
After the security rule has matched a rule and run an ALLOW.
You can run MORE actions on that rule.

Anti-Virus scans
Anti-spyware tries to catch spyware.
vulnerability - looks at flaws like exploits.
URL filtering - requires a license.
File block - will block file types
data filter - will look at security numbers.
You can manage them from the following location.

In objects >> security profiles
then set up different things.
For example I want to be alerted every time someone sends a zip file.
Or everytime someone sends an army number or there is a specific name.
for example if you are doing security for a celebrities attorney then everytime there is a packet
with the word "lindsay lohan" I want to get an alert so I can catch the secretary who is emailing her
sobriety records etc.
Managing policies.
 Here e can control the number of columns we see on the screen.
s
You can also drag and drop rules.
You can highlight unused rules. that might help you remove clutter.
TAGS can be used they are purely an admin tool.
You can set up application filters and groups.

s
Creating this on the firewall is very easy.
In this example I created a Group_filter.
2 groups
Then I create a HR_group and placed all three inside it.
So the HR_Group is made from 2 static groups and one dynamic group filter.
Now I can reference the HR_group in my policy which saves me time.

In the POLICIES >> Security
You can look at a rule then hover over the "application"
this will open a submenu and allow you to pick value which will show
which groups are members of a group so you can drill down from this screen
without having to go to objects.
It is very neat and a group will cascade into another group if there is one nested
and another so you can see the details.

There are response pages which can be changed.
A response page is the page you get when you are being blocked.
For example.
The website you are surfing to is blocked by corporate policy .
In order to make changes you need to load an HTML page.

Logging and seeing the results

So all logs are in the MONITOR tab.
Traffic can be seen
Configuration changes can be seen.
You can filter using the filter buttons.
You can also select when to log
At the end of the session
or at the start of the session.
Start will create many log entries
You can customize applications to close after a certain time.
This helps against DDoS and it helps close faulty applications that waste resources.

s
Reports.
You can create reports.
Excel using CSV
XML

s
You can create a custom report using the filters and column selection.

s
let's move on. finally finished this item.
CONTENT-ID
Stream based.

The URL filtering requires a license
The WildFire requires a license.
Security Profiles
We already showed these.
Anti Virus

By default the AV will detect a virus in SMTP , POP and IMAP
but will only alert you.
The reason is that if it drops the connection, then SMTP will try re-sending it again.
Now, this means you still need a system to protect your Email
and quarantine that Email.

Anti-Spyware.
Best practices is different levels between different areas.
DNS signatures allows you to get a list of DNS that have been compromised
so if anyone is talking to them that means bad news.
I forgot to add.
The reason you need different levels is simply because when you minimize the scanning the performance of the traffic will go up.

Just as a reminder
Anti-Spy on you ware
Are
Backdoors,
keyloggers,
etc.
These will be recongnized using signatures.
So pretty limited against zero day.
Vulnerability protection.


I haven't fully figured it out but the idea is it should be able to detect attacks that have signatures
like overflows or dos.
URL filtering using the security profile.

ss
URL filtering requires a license and is a lot more granular.
Also logged to the URL log which makes your life easier.
This also is not limited to the set categories and can be customized.
 WEB page response can be.
1. Blocked.
2. Blocked put press here to continue and take into account we are now logging you.
3. Blocked, please enter a password to keep going.

the Override is configured from the
Device >> SETUP>>Content-ID
Not sure how this works or who would use this.
 This is what I call a "useless" feature.
Alright, for the intersting stuff we get to do in IT.
This is the MONITOR tab where we have the logs.
Like I said adding the URL filtering license will track the URLs of users when in TAP.
You can use the filters on the right hand side.
I filtered adult.
and I can see some delinquent surfers....
Now, if you have the firewall connected to your LDAP, you will see the source user as the user
that is logged on that PC, this might help if this is a shared PC.
Anyway, it seems like we have one person who is researching swinging sites.

I guess he likes dancing.
now, in general most sites are harmless and I don't care.
But a lot of them will install spy-ware etc.
So I'll alert HR :).
URL categories.
In general there needs to be a company that decides which website is sports or adult or similar.
Back in my days people used Websense a lot.

Palo Alto relied on BrightCloud.
The advantage with it is it uses a disk database too.
Then Palo Alto came up with their own database called PAN-DB.
This is cloud only. So you must have the firewall connected to the web.
The decisions as to what is an adult category can be odd.
For example.

this got labelled as an "adult" material.

I know coffee is only for adults, but I think we might be a little more progressive.
So in general I advocate letting people go to "adult" sites but tracking them.
Then at the same time letting people know they are being tracked.....
Another example.

this is a website with "bikini" fitness models.
Now, I am sure one person might consider this "art"
but if you are surfing to that site at work, I think we can guestimate the reason.
Anyway, someone can still bypass your system by searching for images in a search engine.
Or they can look at a "cached" page in google so your engine thinks this is a google page.
etc.
That is why I advocate leaving it open.
Seeing the "top users" have HR talk to them and scare them.
Scare the rest by telling them they are being "tracked" .
BrightCloud

5000 to 10000 in the data plane cache.
stores 1 million last URLS in Management plane.
The local Disk file is updated once a day
This disk file is the difference between PA-DB
and the BrighCloud.
PAN-DB

Starts with the block list.
Uses the local dataplane cache which depends on the firewall size.
In this case 100,000 to 250,000
Then asks the Management plane.
Then goes to the cloud.
No need for the disk and the dataplane has a larger cache.
If you run out of license. It will still use the cache.
Let's say you came upon a website.
www.racks.com
Where they sell racks.
Unfortunately they used the keyword RACK to label it as adult.

So to solve the issue now place the site in the ALLOW.
To solve the issue for ever click on the "request categorization change".
This will send a note to the people who maintain the database and they "might" change the classification.
Just fill in the details so they can reach out to you and ask you why are you trying to re-label bikini-world.com as a business website.
This one

So to see which one is being used.
Go to the licensing and look at the licenses .
In this case PAN-DB is the active one.
By default the brightCloud is the active one.
Brightcloud also is the one that was used in version 4.0

*59 categories instead of 79 so there will be some unification
* the most restrective setting is picked. For example alert+block = block
* no re-boot.
Securituy profile --> fileBlocking

simple enough.
You can block file types or get alerts.
For the actions.
Continue
The

Continue option.
Sometimes you go to a website.
You are surfing but the website is busy downloading a file in the background.
So in this case you will get a prompt saying.
By the way, there is file downloading do you want to get it ???
I was a little ususre there.
Then if you click yes it will download it.
WildFire

I don't get the relation but let's have a look.
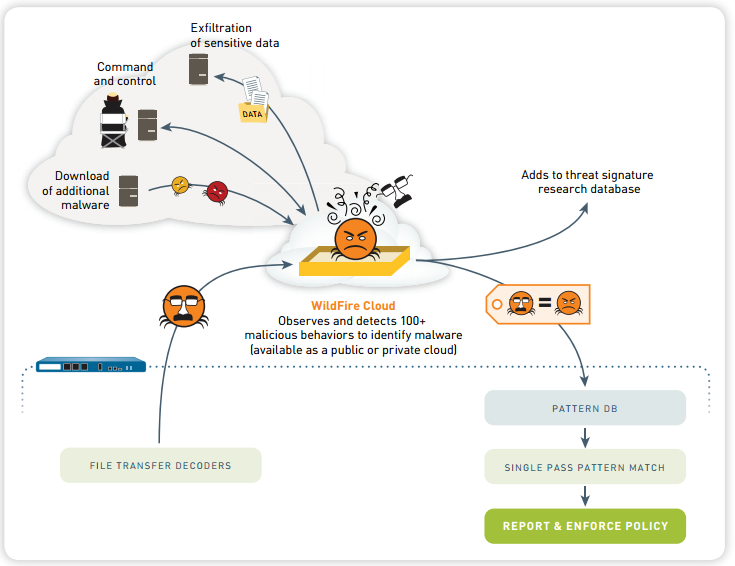
so a file arrives on the firewall.
The file has an extension of .exe or .dll
The file is sent to the WildFire cloud.
The cloud runs it and looks to see what does it do.

If the file does anything like the items above, you will get an alert and the file
will be blocked, it will also generate a signature for that file
and ship it to all the firewalls around the world.
So I guess you can call it sort of a honey pot.
The file thinks he is in.
The file acts.
You log what the firewall does, who it contacts.
Then you create signatures, block those DNS domains etc.

So in the
Monitor >> logs>> wildfire you can see successful detection.

In the Device >> dynamic updates you can set up the schedule.
In this case I am updating the signature database every 30 minutes.
When you get the subscription you get access
So you can send files to WildFire and have them checked using an API.
This allows you to upload samples and run queries on files to get a report.

so let's see.
Device >> setup >> wildfire
Allows you to select which wildfire server to send it to. In the new PA you can have your own WildFire.
the maximum file size is 2MB anything bigger won't be sent.
So now you know, if you have a zero day attack, just send a file that is 2.1MB. ;)).
Session information will allow you to pick which information to send with the file.
Wildfire Dashboard.
https: // wildfire. paloalto.com
you must have a support account in order to submit files.

This is the report you get when you click on the details.

one flaw.
The report is on a Windows 32.
{Dynamic Analysis states that}
So if you wanted to evade wildfire, you would amend your virus to only fire
up if the machine is windows 64 bit.
:)
Report.
The MOnitor >> Data Filtering will show you which files were uploaded to WildFire.
For example.

The order one was uploaded to the WildFire.
and the EXE called spotify was forwarded since it was safe.
I will have to have a chat with the user though since installing spotify takes bandwidth and is only allowed
at manager level.
s
How to apply security profiles.
Again.
You create a policy that matches a specific set of traffic.
You must make the action on that policy as allow.
Then you have the Profile in it you specify which security profiles will run on that traffic.
Instead of selecting each time the items I want like the AV profile so and so and the URL filtering so and so.
You can create a Security Profile GROUP.

OBJECTS >> security profile groups. ADD
As you can see I can select what I want.

DSRI
Is an option you can select at the policy.
This prevents returning data from being checked.
This lowers the demand on the firewall but can lead to a botnet not being detected connetcting to a C&C
ZONE protection - DDoS.
this protects against DDoS.
This is configured in the NETWORK profiles.
basically you configure a number.
If the number goes above the value then you will get an alert.

s
s
SSL decryption.
So the reason we need this is that SSL is a secure communication. The firewall
will unpack the SSL/SSH look at the contct and re-encrypt it when it is going out the interfaces.

Both SSH and SSL decrypt are disabled by default.
SSL asymetric key pair.
Then symmetric for the bulk data.
SSL
Request SSL
The Server sends you a certificate.
You make up a key "key1999" encrypt it with the certificate that you got.
Send this to the server
and since the server has the certificate he can decrypt the message and extract the shared key "key1999".
I'll assume you know what a PKI is.
So this is a referesher and not that deep.

Two people have the same key.
You encrypt and send
The other person opens it and reads it.
*Fast
* but we both must have the same key

Notice that the Public key
is different from the Private key.
This is done using some math
The explanation is too long.
So let's say this happens with Magic.
You get two keys.
One you put online for everyone to use
The second only you have and it is the only way to read those messages they sent you.
This is a slow method of exchanging data.
But you can use it to encrypt a codeword and then use
that codeword as the key for the symmetric encryption.
So Asymmetric is used to create a key for symmetric usage.
Thanks to
Steve Lamb
stephlam@microsoft.com
http://blogs.technet.com/steve_lamb
IT Pro Security Evangelist
Microsoft Ltd
For the easy to understand slides .
Now, the only way I know if that Public Key who claims to be Microsoft belongs to Microsoft
is by having an agency that is above reproach tell me that this Public Key is Microsoft's and not some
Chechen Hacktivist.
That agency is the certificate Authority or anyone you decide to trust
is by having an agency that is above reproach tell me that this Public Key is Microsoft's and not some
Chechen Hacktivist.
That agency is the certificate Authority or anyone you decide to trust
 If you look at my Certificates on my PC>
I have one for America online
One for sonicwall.
There are also more famous ones like DigiCert.
Digicert for example is used by Nasa and Paypal as their authority.
This is what a certificate looks like in Detail.

This is the Microsoft one.
Microsoft considers itself a ROOT.
You can see validity etc.
If you want you can create yourself a Self Certificate.
This is useful for making a certificate for a lab
but no one else will respect it.
So get a CA certificate
This is useful for making a certificate for a lab
but no one else will respect it.
So get a CA certificate
In general you pay a CA authority like Verisign they give you a certificate.
Then you can create a certificate authority and give
your company devices their own certificates.
They will trust you
Palo Alto certificates.
Device>> certificate management

You can create one yourself, called GENERATE.
You can import one from a CA authority
You can set up a list of the default Certificate Authorities you trust.
Certificate import is PEM format.
You can import one from a CA authority
You can set up a list of the default Certificate Authorities you trust.
Certificate import is PEM format.
SSL
 so, the client in the LAN connects to amazon HTTPS.
The amazon server will send a certificate. The palo alto will take that certificate and create a self signed one.
The client still got a certificate so it will encrypt to the firewall. The firewall
will take that out and re-encrypt it with the original real certificate.
The firewall read the info in plain text but no one is the wiser.
If the certificate is not trusted by the firewall default authorities.
Then the firewall will issue an un-trusted cert, you can decide if you want to continue.
If you do, then the same thing happens.
The firewall will again be able to read the material.
As a side note the clients that use the firewall for outbound proxy like the above system
must have the firewall on their "trusted" certificate list on the browser, this helps them getting
a note the site is untrusted.
Inbound SSL

so the Palo Alto needs the same certificate as the Server.
Now when a request arrives, the Palo Alto will forward it to the server.
The Server will build a connection ot the end user.
But because Palo Alto has that certificate too, it can decrypt the data as it is passing.
Now when a request arrives, the Palo Alto will forward it to the server.
The Server will build a connection ot the end user.
But because Palo Alto has that certificate too, it can decrypt the data as it is passing.
Problem solved.
Now i can see all the communication to the servers.
Now i can see all the communication to the servers.
On Palo alto.
Now you don't want to decrypt everything as it takes resources.
So what you need.
Now you don't want to decrypt everything as it takes resources.
So what you need.

is to set up rules.
From zone to zone with addresses so and so.
Then SSL forward proxy {this is used from LAN to WAN}
or
SSH proxy to decrypt SSHv2
or SSL inbound to track what is being done at your servers.
The URL category tab can decide which sites to decrypt based on the URL categories.
For example, you might not want to decrypt financial websites to prevent the firewall storing credit card
numbers.
A decryption profile allows you to limit people
FOr example.
If the servers certificate is out of date, then you can chose to prevent the clients from
connecting altogether.
OBJECTS >> Decryption profile.

USER ID
Alright, you are trying to look for a user that is hogging the bandwidth and surfing in "immoral" sites.
Mr. Tomas .
Anyway,

as you can tell, all I can see is the IP.
Now I would have to ping -a in order to get the hostname so I can try guessing who that user is.
USER-ID will match the IP in the source destination to a user using the LDAP.
You are also using the groups from the LDAP.
Now you can control policy with rules that have users and groups.
You can also filter logs more easily to find incriminating evidence.
Palo alto can use the techniques below to match the USER-ID to the session.
s

so Palo alto gets user and groups from LDAP.
Palo alto looks in the logs for the "authentication" sequences that were done against the LDAP AD.
Then it maps the IP to the user.
So exchange and LDAP will use the logs to get the user details.
You enable USER-ID on a zone.
You can connect to many AD forests.
Palo alto looks in the logs for the "authentication" sequences that were done against the LDAP AD.
Then it maps the IP to the user.
So exchange and LDAP will use the logs to get the user details.
You enable USER-ID on a zone.
You can connect to many AD forests.
 Bind = Read only account
GC global catalog is 3268
LDAP is 389 port
s

You can limit the groups that will be synched.
If the group is not included then the log will not have the user added to it.
You can use the palo alto as an LDAP proxy.
This reduces queries on the active Directory server.

2008 add it to "Event Log Readers"
2008 if you use an agent DCOM user
2003 Auditing and Security Logs group
WMI must use the Domain administrator account
NTLM Must have ADMIN access.
AD Track in the logs the user logins.
Exchange looks at the sessions that are setup.
look at the user session on the server
WMI query against the workstation

You can install a software that runs the user-ID queries.
the key difference is that the firewall does WMI only while the software
can probe Netbios OR WMI

one firewall can redistribute the data
it got on USERs by using the Redistribution.
Each AGENT can distribute to a number of firewalls.
Captive Portal>

NTLM is for microsoft
Web form is for non microsoft.

So
You surf.
You get a redirect.
The redirect sends your browser a please
Send me your NTLM.
The browser sends it.
You are mapped.
If it can't send it then it will switch to the web page authentication using web form.
302 is error redirect.
NAC , Wireless 802.1x etc all can use XML to update the firewall with the user details.
troubleshoot
show user user-id-agent statisticsshow user user-ids
show user ip-user-mapping all
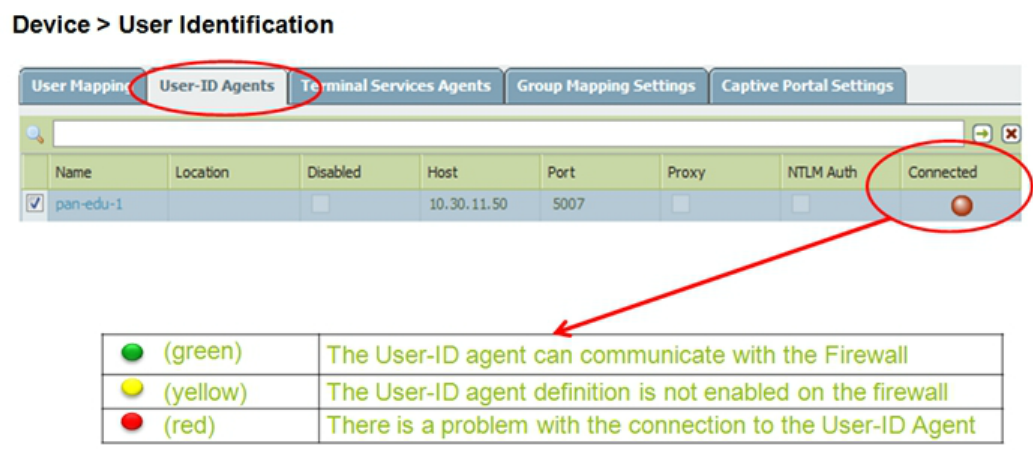
Default port 5007
Check sure USER agent and firewall are talking.

x86 palo alto user-idagent file
UaDebug file
s
s
Turn on debug
Go to CLI
>debug user-id agent <agent> on debug
>debug user-id agent <agent> receive yes
>debug user-id agent <agent> off
also look at the
monitor >> logs >> system
terminal servers.Citrix and Microsoft Terminal servers can run with many users on them.
They will all use the same IP.
The only difference is that each user gets a different port.
Since the port allocation is dynamic, the only way to map the users is to install an agent on those
Servers.
The Agent will track the users based on the source port/IP
XML-ID.
Anything that tracks an IP to a user allows you to run scripts against the device
Then forward that info to the firewall.
Uses SSL/ TLS to send it.
You can use keepalives or timeout after 10 minutes.
To run this enable the "Enable user-ID XML API" when setting up the agent.
This will allow the API to reach it.
Agent listens on 5006
Agent talks to firewall using SSL.

When you create a role you can enable it to communicate with user-id agents using XML.
USER-ID API is only good for getting user data to the firewall.

XML example of the API.
Dynamic Address object allows you to add an entry and not require a firewall commit everytime.
You create a Dynamic Address Object and then you can change items in the data of it.
This is excellent for virtual environment.


s
s
To see the actual dynamic mappings in place you need to use CLI.
show object dynamic ALL
show object dynamic ID <ID>
show object dynamic IP <x.x.x.x>
Global Protect
better protection.
Offering connectivity.
Info on the host information profile.
This is an extension.
So
APP-ID for the applications
CONTENT-ID for the insides
USER-ID to correlate user info
Host Profile can allow you to control the endpoints.
Operating system
Application patch levels
Anti Malware versions
Firewall version
Disk encryption
Data backup ??
customized.
So a user connects to the Portal.
The user will be able to download the AGENT.
Then the AGENT can connect to the portal and get the settings.
When the AGENT connects the firewall will be able to tell if he is on the LAN or the WAN
and based on that decide if he needs to set up IPSEC tunnel.

In order to run this you need.
Portal
Gateway.
Pre 4.1 they each needed their own IP and interface.
Post 4.1 they can be on the same IP.
If there are no hostchecks then you don't need GlobalProtect licenses.
If the same IP is used then you don't need globalprotect licenses.
If you have many gateways configured then they need to be on VPN to each other.
Also you only need ONE portal with a one portal license.
If you have many gateways and one portal you need a portal license
If you also have the HIP host checker then you need gateway licenses.
You can use the Global protect to run your firewalls.
The Portal will be the target and every new firewall you add will be configured to connect
to the portal and get the configuration.
THis is called a Satellite.

Host
The Agent on it will contact the portal
Will download it or get the settings.
It will then connect to the gateway.
If gateways have the same priority then it will try the fastest one.
Agent is MSI or PKG {mac} 32bit or 64bit
You can set up different levels of control on the agent.
FQDN or IP of the portal
SSO or user name and password
For IPADs or similar you can use a third party VPN client.

The above is the username and the password
Along with the portal, in this case they used FQDN
Client sends certificate.
Portal sends the
1. Trusted CA.
2. HIP instructions
3. DNS/IP map to connect the internal/external gateway.
4. List of gateway.
It does reverse DNS using the DNS/IP map then if it answers the correct internal DNS.
It knows it is internal.
So for example. internal.microsoft.local = gateway
So if you are in the WAN when you query the DNS of the gateway it will not translate to the "internal" one
If you are in the LAN it will translate .
If the agent is internal, it will send the data to all the gateways in the list.
If it is external it will try SSL
then pick one based on SSL/priority.
Once the SSL is setup it will try converting it into a more efficient IPSEC.
Setup
All items must have a certificate so they can run SSL
The PORTAL can act as the CA {certificate authority}
Client certificates are used in order to identify the clients.
Device >> certificate management >>certificate profile
sets up the certificate management, like what to do if it is not valid and who is the CA for checking them
Device >> globalprotect client
will let you see which versions do you have and which one is active
Download will get the version from the internet.


Downloaded means you got it from the web.
When it has finished downloading it will say "activate"
Then when you click on "activate" , it will become active in the portal.
Gateway support split tunneling.
So local traffic goes to the internet while corporate goes to the gateway.
Gateway enforce policy based on the HIP they got.
Configuring gateway
Network >> GlobalProtect >> Gateways

Network >> GlobalProtect >> Portals

this will configure the portal.
The IP address gets filled in automatically when you pick a LAYER 3 interface.
Configuring the portal-


How clients connect to the globalprotect.
You manually invoke it.
It is invoked when you logon
you also have PRE-logon and then security login.
Match the users to the profile.
You can set up a priority on the gateways,

Client can disable the Global Protect.
You can set it up so he has to
1. Put a comment on why.
2. requires a passcode only IT have.
3. requires a ticket

Okay, the Ticket works like this.
The user clicks disable.
You get a Request.
Then you have to communicate the disable code to the user so he can disable it.

Agent
connects - optional manual.
send HIP reports.
Advanced View gives you the ability to troubleshoot and look at settings.
Also allows logs.
HIP objects are things you can look for.
Every 60 minutes.
Create the HIP objects on Panorama.
Custom Check can verify something like a registry or files.
HIP profile
contains many HIP objects.
You can configure the gateway to send a notiofication that you have not apassed the test
of the HIP
Monitor >> logs >> system
filter for globalprotect.
High Availability.
Active Passive
Synchronize the connections.
Certificates
response pages
Configuration.
this will NOT by synchronized.
State-less connections
Admin accounts
HA configuration.
PA-200 and VM
support HA-lite.
You can set up a backup path for heartbeats.

PA 3000
PA4000
PA 5000
All have dedicated HA1 and HA2 interfaces.
If you are connecting directly then please use a crossover cable.
admin accounts are not synchronized.
Dashboard will have the statuses.
Initial starting - wait 60 seconds
Active
passive backup
Suspend - done by admin
non-functional is an error.
Unknown is never tried this.

Split Brain.
Passive can't hear heartbeat.
Can't tell if it is down.
So the passive will become active.
solution is backup using the management link
or you set up another HA1 link.
or both.
Active Active.
HA and HA
Goes out Firewall 1 and comes back through firewall 2.
So to do that we will add another link HA3.
PA-200 and VM can't do Active Active only LITE.

Session owner can be the firewall that first got the packet
or the firewall that is Active - primary .
This device does the layer 7 APP-ID, Content ID threat scanning
Also will do the traffic logs.
Session setup - can be determined
Layer 2 to 4 and NAT.
You can distribute using a hash or modulo.
If the session owner and the session setup are in different firewalls the packets will move
from firewall A to firewall B so you might need to schedule HA3, depending on the traffic.
First packet = session owner would be the recommended for production.
The other option of the Primary being responsible is used for troubleshooting to determine the path.
Setup session on
Modulo of source
Hash of source and destination.
Primary device .
HA active active.
Routing
Seamless
Addresses.
Virtual Wire uses routing.
You can set up VRRP
You can set up ARP sharing virtual IP.
Priority of the device.
0-255
0 is the one that will be elected.

HA 1
HA 2
HA 3 setup.
I'll save you the screenshots.

Setting up floating IP or ARP load share.
VM firewall.
Used to protect VM servers or VM desktops.
The requirements.

So,
1 CPU is for management
4GB Dram and anything above that will go to the management.
One NIC must be dedicated for management.

s
s
ss
s
Saar, I wanted to thank you personally for the level of effort that you put forth in creating this awesome document. This doc will indeed assist in my pursuit for the CNSE.
ReplyDeleteSaar, thank you very much! What an excellent, comprehensive and well written article! Cheers!
ReplyDeleteThank you for this excellent, well written article.
ReplyDeleteThis comment has been removed by a blog administrator.
ReplyDeleteGrate job Saar. All best Thank you!!
ReplyDeleteThis comment has been removed by the author.
ReplyDeleteOutstanding, well-written article. Thank you for taking the time to publish this information
ReplyDeleteOutstanding, well-written article. Thank you for taking the time to publish this information
ReplyDeleteHi Sir,
ReplyDeleteI am starting my plao alto studies newly. If I go through above article will that be enough. Please guide me sir, I cannot afford for training and I do not have VM trial to practise. My friends told to study this firewall as it is in boom now. I am in search of job please help sir.
Hi Sir,
ReplyDeleteI am starting my plao alto studies newly. If I go through above article will that be enough. Please guide me sir, I cannot afford for training and I do not have VM trial to practise. My friends told to study this firewall as it is in boom now. I am in search of job please help sir.
Can there be a PDF version for this? that can be downloaded?
ReplyDeleteHenry, You can save it in PDF version.
ReplyDeleteThank you so much Saar
HI,how can save this as pdf .please help me because i am having very very slow internet this taking lot of time to display page .please help me.thanks
ReplyDeleteHi,
ReplyDeleteInstall a PDF Printer like
http://www.bullzip.com/products/pdf/info.php
Open in the internet and then print to a PDF.
Thanks Saar for all your efforts preparing the article...
ReplyDeleteHOW TO INSTALL PALOALTO FIREWALL ON GNS3 AND CREATE YOUR FIRST TEST LAB >> https://techzytel.blogspot.com/2019/02/how-to-install-paloalto-firewall-on.html
ReplyDeletethanks for valuable information about , installation process of Palo Alto networks
ReplyDeleteI am from a Accredited Configuration Engineer background, and now looking for a change in ACE PAN-OS 8.0. Now since do not have much knowledge of ACE Exam. Will Paloalto ACE exam help in getting a decent job? Also You can prepare yourself for the ACE questions to get ACE PAN-OS 8.0 credentials.
ReplyDeleteInitially I was searching for a suitable syllabus for preparation of Cisco. I visited so many sites but couldn’t find a required material. Finally I read a comment about Dumpspass4sure I followed the link and reached the demo questions. Got satisfied and downloaded Pass4sure Cisco Dumps with a guarantee to pass the exam by the first attempt. I am happy now that my choice was right and now I am certified in Cisco. Today I am writing here a comment with an expectation that someone may be as happy at some time as much I am. Thanks to the whole team of Dumpspass4sure.
ReplyDeleteThis comment has been removed by the author.
ReplyDeleteSaar, thank you very much! Excellent Article...
ReplyDeletePalo Alto Networks Certifications
Hey admin, I found some really interesting things. Thank you so much for sharing this. Google Chrome Tips Clear Cache, Cookies, History
ReplyDeleteThanks for sharing this post and its very help, Also Check this Ways to Hide or Show Windows Security Icon on Taskbar
ReplyDeleteI enjoyed over read your blog post.Your blog have nice information, I got good ideas from this amazing blog. I am always searching like this type blog post. I hope I will see again… Uses Of Task Scheduler in Windows 10
ReplyDeleteI truly like to reading your post. Thank you so much for taking the time to share such a nice information Windows 10X- An Overview
ReplyDelete